Learning Cocoa

Backstory

Haven’t blogged in a while, been caught up with transitions to work from just graduating. Recently I started learning Cocoa for work. I’m not completely new to making apps using frameworks, but still pretty fresh out of school.

I have some experience with Android, so this post will describe my experiences learning Cocoa coming from more Android side.

Cocoa vs Android

I found the whole Cocoa framework to pretty acceptable and usable. That being said, tutorials for OS X Cocoa are pretty non-existent, and iOS is marginally better. So unless you pay to buy books, expect heavy digging. Buying a book from Big Nerd Ranch is probably your best bet. Android is much better to learn as a beginner. And then the transition into Cocoa isn’t too bad.

If only Apple spent more resources developing and maintaining a set of tutorials for Cocoa, like Google does for Android, I think Cocoa would become slightly more popular.

Of course, the barrier to entry for Cocoa development is still limited by how costly it is for a setup. You’d need iOS or OS X device, and pay $99 for developer access per year. Where as pretty much any phone can run Android, and it’s free to develop.

Cocoa’s IDE: Xcode vs AppCode

But being a programmer by trade, I’m a little hesitant of doing any work that involves heavy use of GUIs. And developing for Cocoa you’ll almost certainly be using Xcode. The alternative is to use another IDE or use the plain old text editor.

Let’s face it. You can’t manage this with text editors. Given how some files are structured, like XIB files, it pretty much screams at you to use an IDE.

XIB stands for the XML Interface Builder. Interface Builder is a software application which allows you to develop Graphical User Interface with the help of Cocoa and carbon. The generated files are either stored as NIB or XIB files.

If you’re looking at IDEs, the major competitor to Xcode would be AppCode. Now Xcode isn’t bad itself, anyone who’ve ever used JetBrains software knows that Xcode’s compiler reasoning is garbage. Definitely AppCode wins here. Not only here, but across the board for compiled language IDEs. Making recommendations is their specialty. Ironically, because AppCode is put so much effort here, it isn’t very good for making GUIs like Xcode. Among other things utilities like Instruments (monitoring your app), etc. But keep in mind I have used JetBrains stuff longer than I have Xcode, so I have my biases here.

In short, AppCode for writing code. Xcode for making interfaces, because Interface Builder is king.

Programming Paradigms

Both Android and Cocoa follow similar patterns, mainly MVC. Sometime in the future, I want to learn more about Reactive Programming, rather the observer pattern. But for now, I can’t comment much, because I haven’t got anything to compare to.

Conclusion

Well a lot more can be said about programming for Cocoa. But that’s all the blogging I will do for now. Sleep, and I may come back to this post.
Guest Wifi Setup DD-WRT Tutorial

This is a tutorial for setting up a DD-WRT router to have a separate isolated (virtual) guest wifi access point. At the end of the tutorial you will have two wifi networks, one private, and one public for the guests. Guests will not have access to the router or anything else on your network.

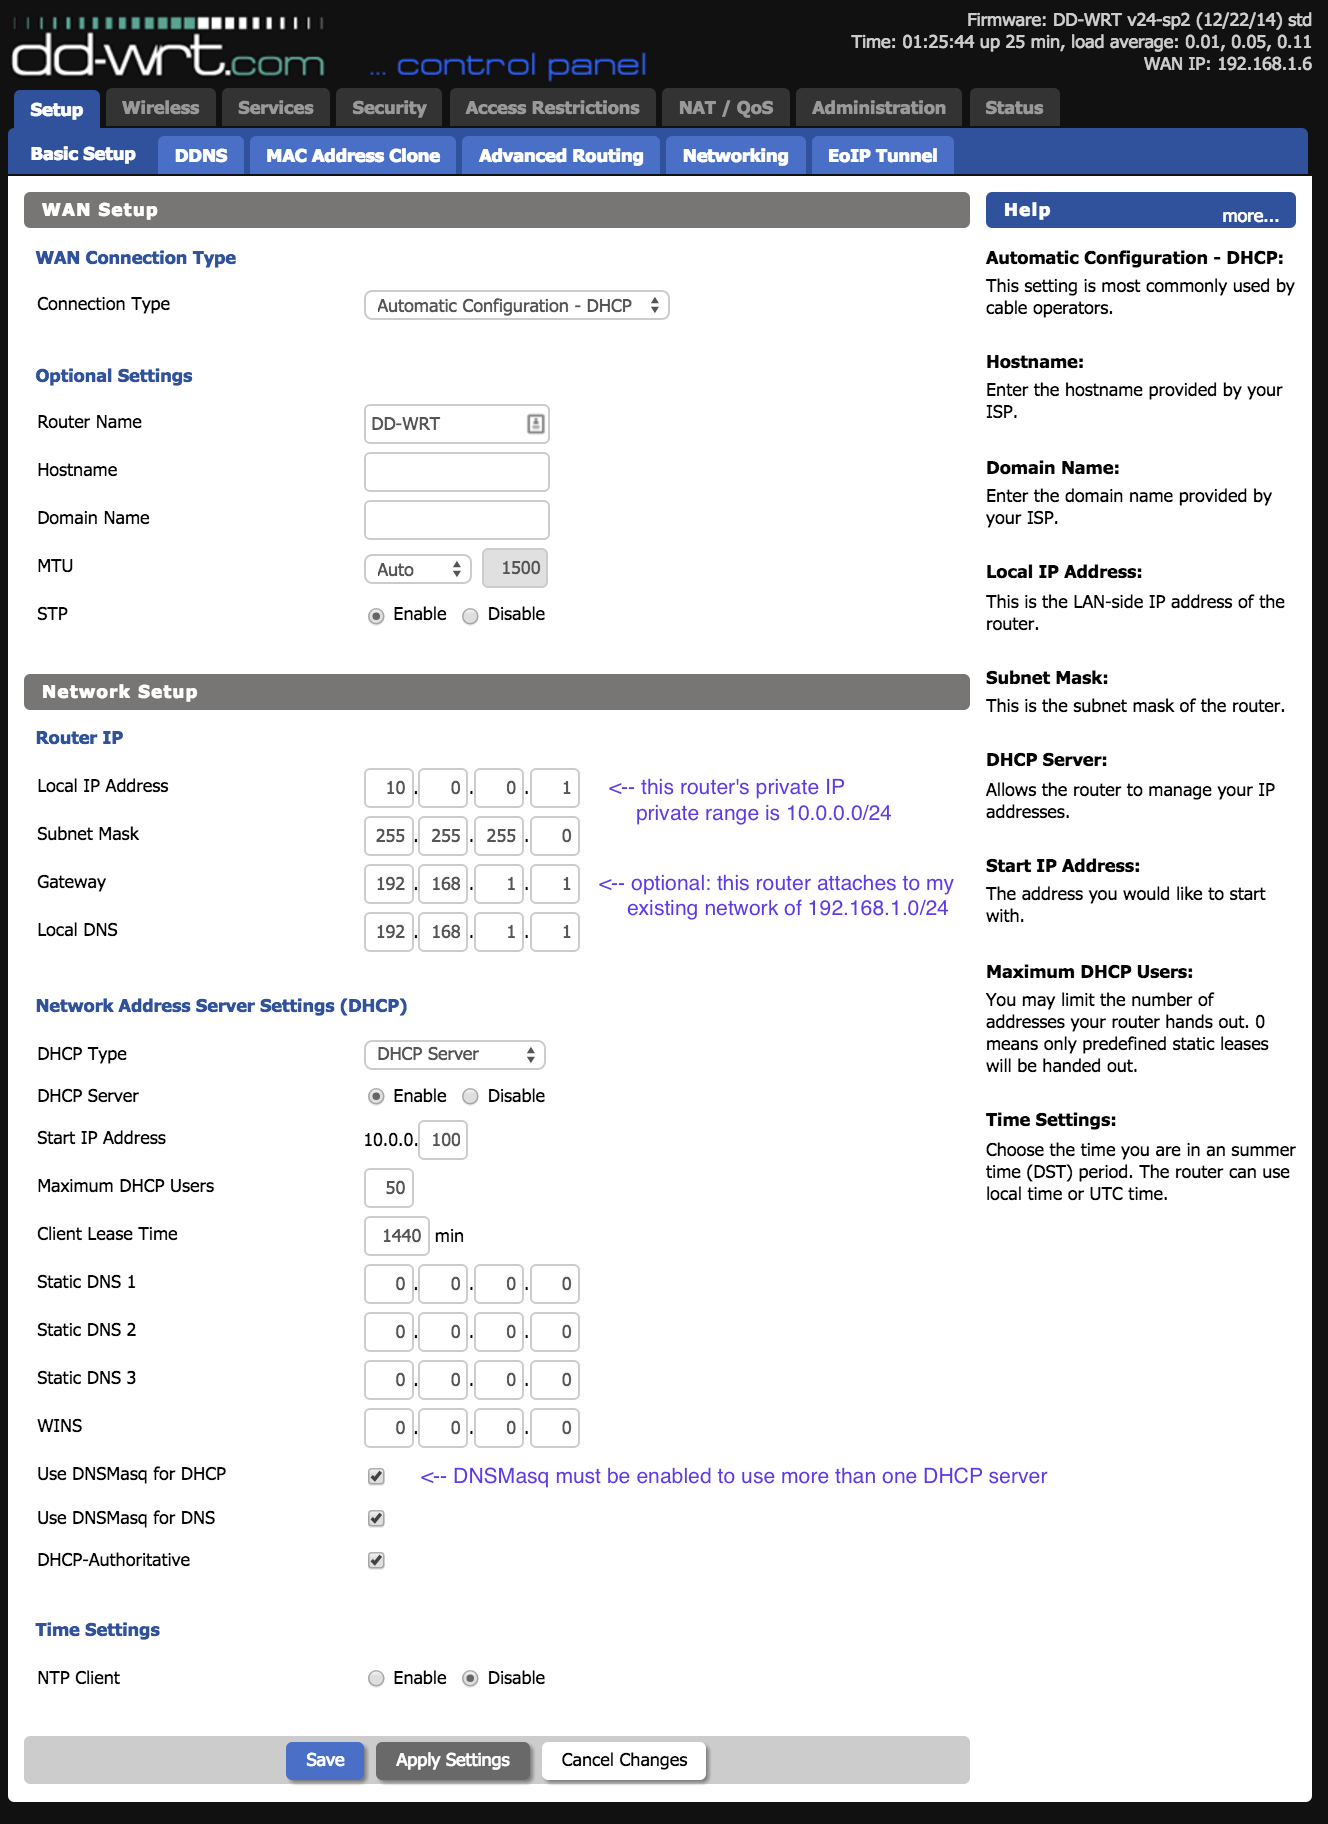
  1. Your build must be ≥ 23020. There should be a network already running and you can access the internet.0 network basic setup
  2. Create the virtual access point for your guests.
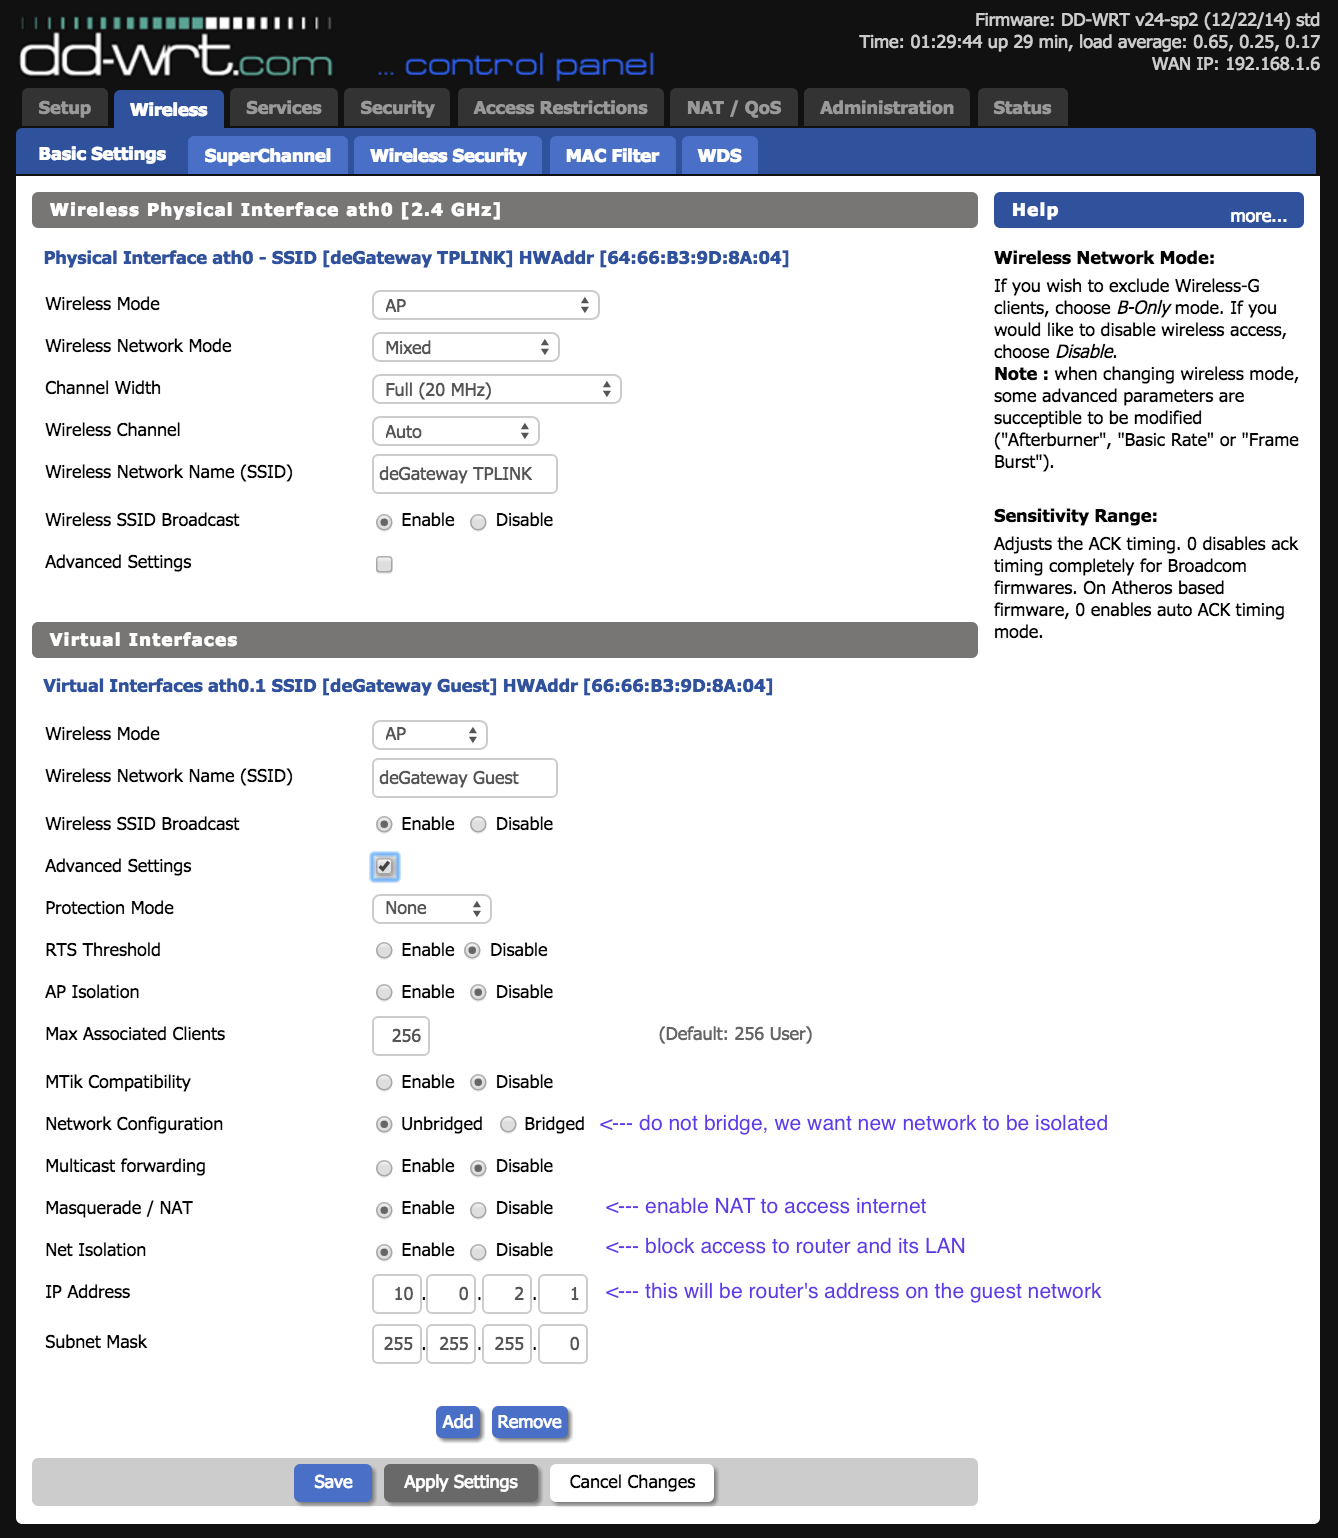
    1. Go to Wireless -> Basic Setup
    2. Click Add in Virtual Interfaces. Fill out the details as in the image.1 wireless settings
  3. Optional: Go to Wireless -> Wireless Security, choose your encryption for the guest wifi.
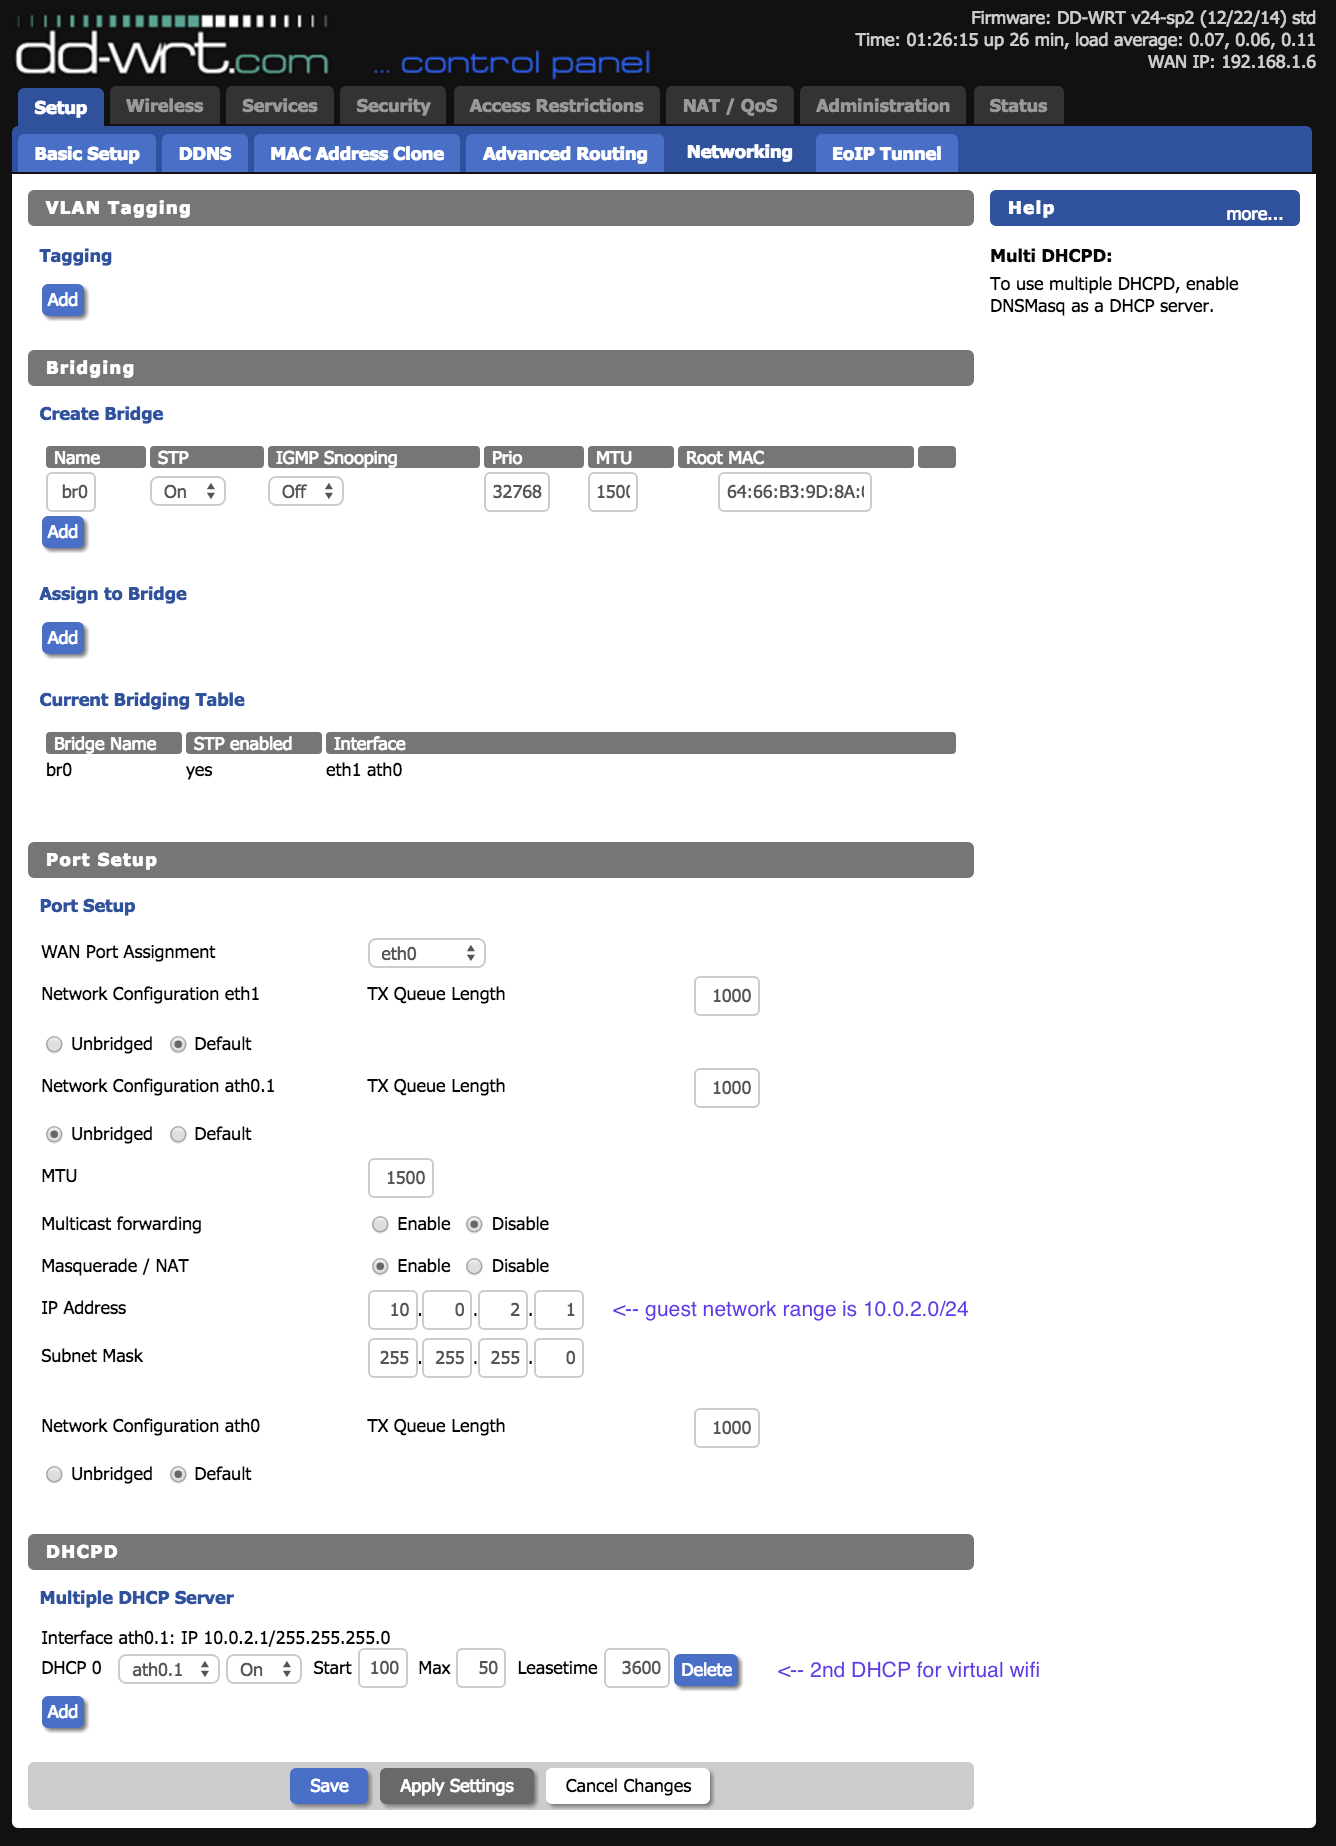
  4. Now enable DHCPD for the guest wifi so IP addresses can be assigned.
    1. Go to Setup->Networking and add another dhcp server for the guest network as shown.2 networking
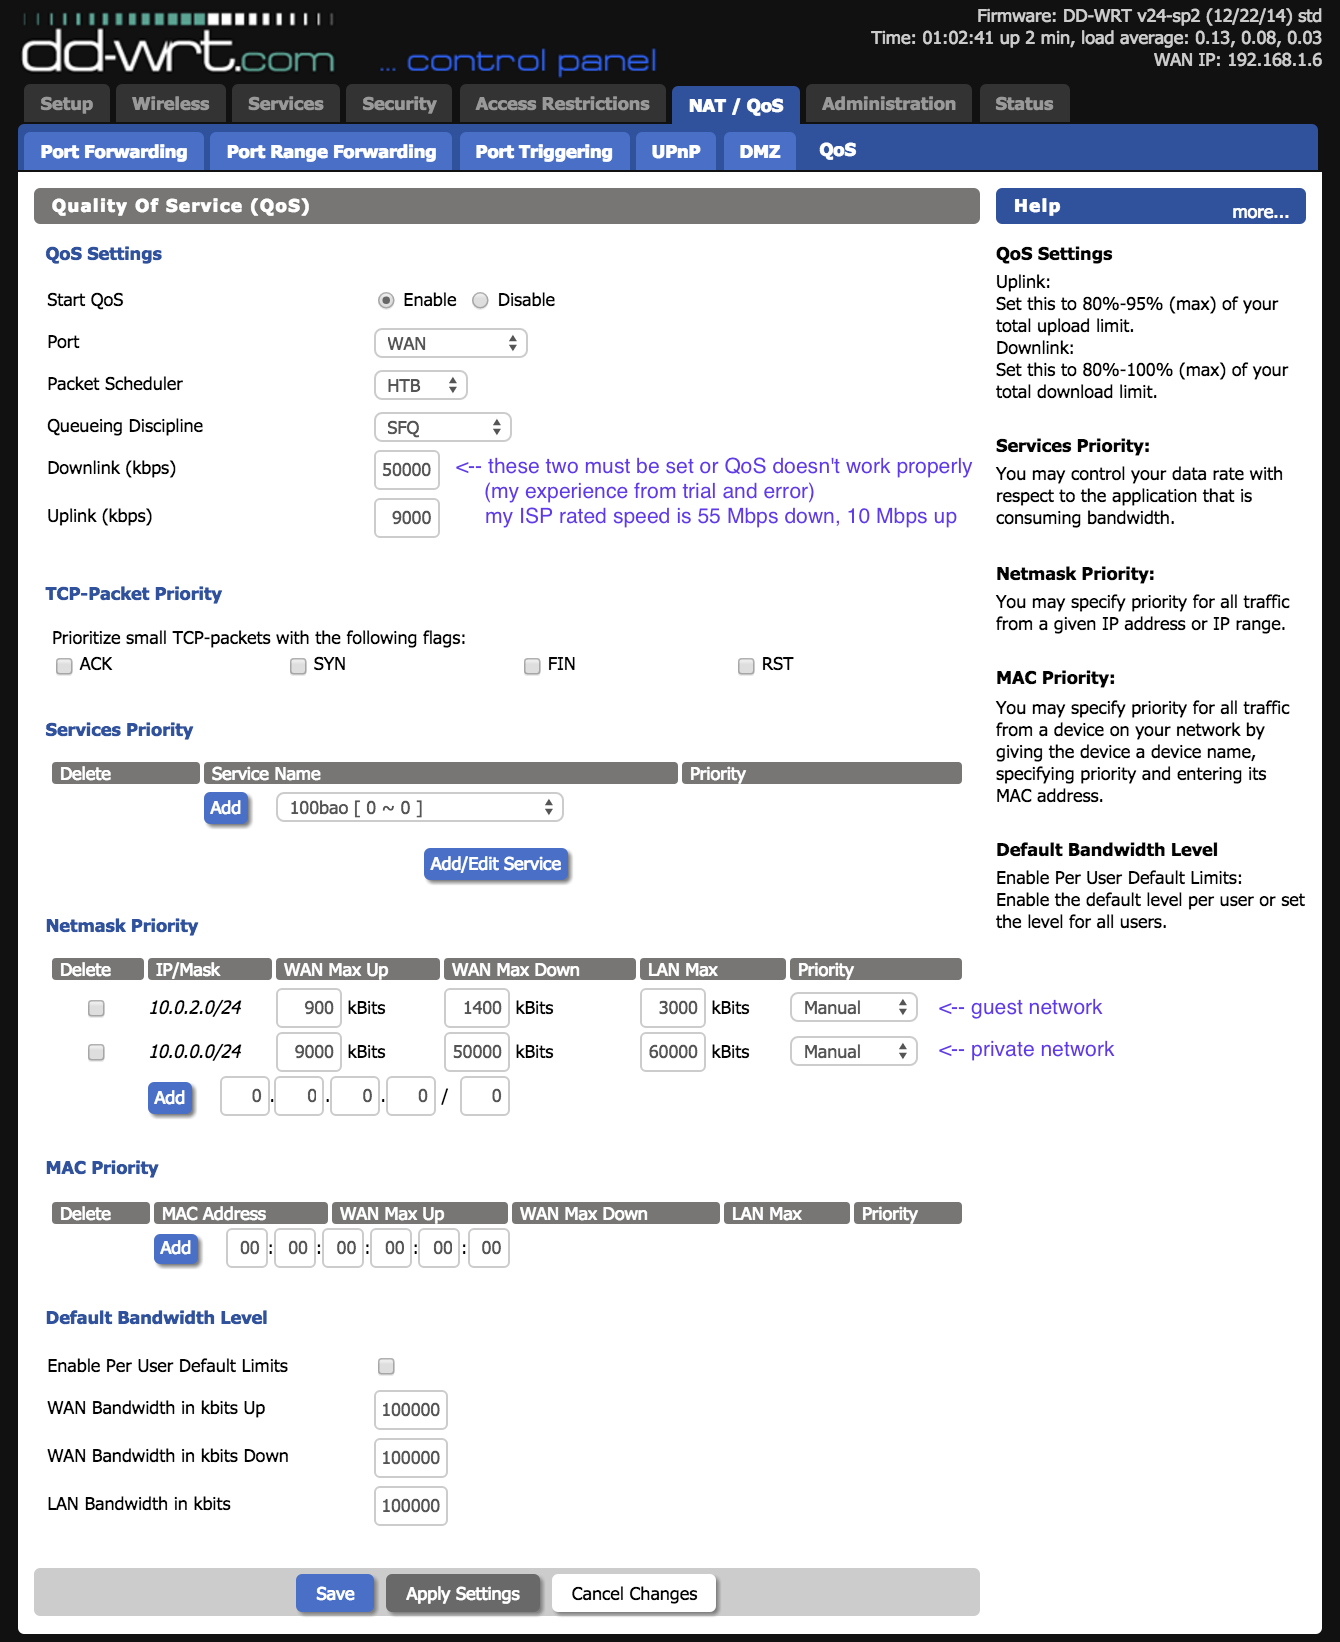
  5. Optional: Setup Quality of service (QoS) to limit guest network bandwidth.
    1. Configure QoS as shown.3 qos
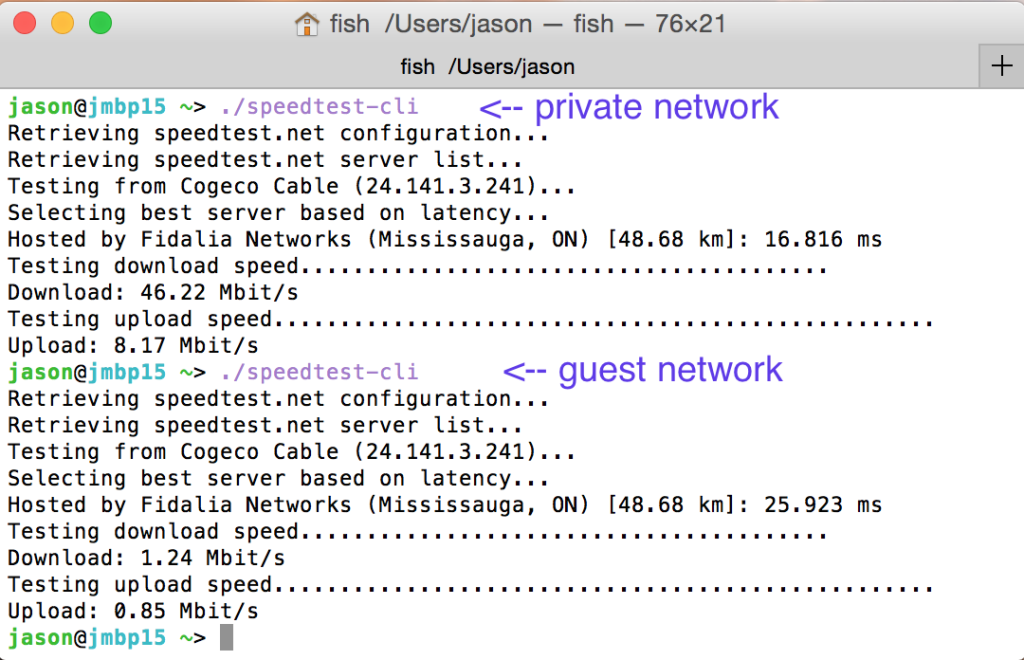
    2. Results from my speed test.4 speed test
  6. Restart the router. Important because I found sometimes changing settings they take a while to activate and you’re not sure if it has had any effect.


Links I found useful.


Guacamole Add User

Adding a user

https://gist.github.com/sunapi386/9dc6eb841f1454733e02

Create a user

Then create the user; remember setting to his password to “chessman123”

sudo adduser binsun

Modifying guacamole’s user login data

Edit the user mapping, unless you’re using a database to store user logins.

sudo vi /etc/guacamole/user-mapping.xml

Create the entry like below, one for vnc and one for ssh.

<!-- User for binsun -->
<authorize username="binsun" password="chessman123">
    <!-- First authorized connection -->
    <connection name="vnc">
        <protocol>vnc</protocol>
        <param name="hostname">localhost</param>
        <param name="port">5904</param>     <!-- Edit this -->
        <param name="password">qwe123</param> <!-- Password for vncserver -->
        <param name="encodings">zrle ultra copyrect hextile zlib corre rre raw</param>
    </connection>
    <!-- Second authorized connection -->
    <connection name="ssh">
        <protocol>ssh</protocol>
        <param name="hostname">localhost</param>
        <param name="port">22</param>
        <param name="username">binsun</param> <!-- Edit this -->
        <param name="password">chessman123</param> <!-- Edit this -->
    </connection>
</authorize>

SSH Service

I assume the SSH service is already running on port 22, so that should already work.

Relaunching service

We just need to start the VNC service listening in on port 5903.

sudo /etc/init.d/tomcat7 restart

Restart hosting service so it loads the updated user-mapping.xml.

Logging

If logging in fails, check the log for login attempts.

tail -f /var/log/tomcat7/catalina.out

Setting up VNC

In the newly created user’s home directory, create a file called xstartup. This file is a script that gets run when the vncserver starts. Guacamole starts the vncservice.

First we switch to that user.

su binsun

Then create the startup script

mkdir ~/.vnc
chmod 700 ~/.vnc
cd ~/.vnc
vi xstartup

Put these in.

#!/bin/sh
xrdb $HOME/.Xresources
xsetroot -solid grey
#x-terminal-emulator -geometry 80x24+10+10 -ls -title "$VNCDESKTOP Desktop" &
#x-window-manager &
# Fix to make GNOME work
export XKL_XMODMAP_DISABLE=1
#/etc/X11/Xsession
startxfce4

And make this excutable.

chmod +x xstartup

While we’re still logged in as the user, start the vncserver

vncserver :4

This creates the service listening on 5904 port. You should be able to see it.

nmap -Pn localhost

Starting Nmap 6.40 ( http://nmap.org ) at 2015-10-19 21:40 EDT
Nmap scan report for localhost (127.0.0.1)
Host is up (0.00055s latency).
Not shown: 988 closed ports
PORT     STATE SERVICE
22/tcp   open  ssh
25/tcp   open  smtp
631/tcp  open  ipp
3306/tcp open  mysql
5902/tcp open  vnc-2
5903/tcp open  vnc-3
5904/tcp open  unknown <------- this is it
6002/tcp open  X11:2
6003/tcp open  X11:3
6004/tcp open  X11:4
6005/tcp open  X11:5
8080/tcp open  http-proxy

If you can’t get vnc started, look at this log.

tail -f /var/log/syslog

Customer Support Platform

Customer Support Platform

October 1, 2015

Increase customer support efficiency by using preformed answers and optionally modifying it before replying to customers.

Goal

Build an API as demo to investors, about 3 weeks away. Basically a customer hands over their customer support chat logs, we provide back query-responses through API. The (reiterated) version of the problem is: retrieve relevant responses (from previously seen responses) based on customer question.

  • Treat customer question as a query.
  • Retrieve a reasonable response.
  • The meat of the problem lies in creating a good mapping from query to a response.

Due to the timely nature of building a demo in short time, I look to using pre-existing tools rather than develop an entire process from scratch. Obviously it’s hard to publish any papers on using existent techiques, but our goal constraint involves more engineering than research.

Pre-existing tools approach

Apache Lucene

Apache Lucene, arguably the most advanced, high-performance, and fully featured search engine library in existence today—both open source and proprietary. But since it is a library only, it would be difficult to get started – you’d need to build around the library. This is the search engine library used behind Wikipedia, Guardian, Stack Overflow, Github, Akamai, Netflix, LinkedIn.

  • Lucene has pluggable relevance ranking models (NLP information extraction and sentiment analysis) are built in, including the the Vector Space Model and Okapi BM25.
  • The power of Lucene is text searching/analyzing. It’s very fast because all data in every field is indexed by default. Text searching focused applications should definitely use Lucene.

There are two predominant platforms built on top of Lucene. Apache Solr, and Elasticsearch. These two are built and designed for full text search on top of Lucene. Both are open source.

ElasticSearch is friendlier to teams which are used to REST APIs, JSON etc and don’t have a Java background, so we’ll run with that.

Elasticsearch

Elasticsearch is also written in Java and uses Lucene internally but makes full-text search easy by hiding the complexities of Lucene behind a simple, coherent, RESTful API.

  • Also pluggable ranking models! This is important to try different approaches to getting good customer results. The modularity of this means we can build one pipeline, and improve our response by using different ranking models.
  • Can be plugged with our own custom ranking functions. For instance, we might care about
    • Information decay, where more recent responses snippet at the top.
    • Ranking based on uses and non-uses of a response snippet.
  • Customer’s questions treated as query input, and support agent’s responses treated as snippets to look up.
  • References
Searching
  • Relevance: Elasticsearch’s main advantage over a traditional database is full-text search. Search results are sorted by their relevance score. The concept of relevance is completely foreign to traditional databases, in which a record either matches or it doesn’t. See Full Text Searching.
  • Phrase Search: Sometimes we want to match exact sequences of words, phrases. Use the match_phrase query in Phrase Search.
  • Highlighting: Although not super important, we can highlight the snippet that matched our search. Highlighting.

Ranking Models

Using a good ranking model is the meat of the problem. Famous ranking models:

  • TF-IDF What is TF-IDF? The 10 minute guide Wikipedia TF-IDF
  • BM25 is regarded slightly better in our case than TF-IDF.
    • Quote from Similarity in Elasticsearch: There is a reason why TF-IDF is as widespread as it is. It is conceptually easy to understand and implement while also performing pretty well. That said, there are other, strong candidates. Typically, they offer more tuning flexibility. In this article we have delved into one of them, BM25. In general, it is known to perform just as good or even better than TF-IDF, especially on collections with short documents.
  • Consider taking Coursera on NLP, learn more about ranking models.

These two above are considered statistical analysis. In recent years, fundamental break-throughs were archieved using machine learning, specifically with neural architectures, in several subfields of AI – computer vision, speech recognition, machine translation. Consequently, more advanced ranking models could be derived from approaches in neural networks.

Training Data

Evaluating any prediction or recommendation engine relies on having a good set of data. The Ubuntu Dialogue Corpus is one such dialogue dataset.

Ubuntu Dialogue Corpus

The Ubuntu Dialogue Corpus, introduced by this paper, contains almost 1 million multi-turn dialogues, with a total of over 7 million utterances and 100 million words. Along with introduction of the dialogue corpus, the paper also discusses learning architectures suitable for analyzing this dataset.

Specifically, the following architectures are benchmarked for performance:

  • Term Frequency-Inverse Document Frequency (TF-IDF, which is what is used by the Elasticsearch/Lucene engine)
  • Recurrent Neural Network (RNN)
  • Long Short-Term Memory (LSTM) architecture

Performance evaluation is based on the task of best response selection, without human labels. The agent is asked to select the k most likely responses, and it is correct if the true response is among the k candidates. The family of metrics used in language tasks is called Recall@k. For example, k = 1 is denoted as R@1.

The observed result is that the LSTM outperforms both RNN and TF-IDF on all evaluation metrics.

Daerli Chinese Conversation Log

A confidential corpus of support dialogues are to be used in our testing, as customers involved are Chinese companies.

QR Authentication Tutorial

QR Authentication Tutorial

Tutorial on how to setup a QR Authentication web server and android app. This documents me trying to replicate the WeChat web login process, in two parts:

  1. An android application that reads a QR code and logs in
  2. Building a website that hosts this.

The tutorial is written in a sequential fashion, because I’ll add to this tutorial as I go. All my code is on https://github.com/sunapi386/qrauth.

Motivation

I came across an interesting way to authenticate users from WeChat Web. Their login process is as follows:

  1. The website has a QR image which the users scans with his WeChat app.
  2. User clicks “Log In” in the WeChat app to authenticate.
  3. User is now logged in.

The WeChat website looks like this. A unique QR code is generated each time the website is refreshed.

WeChat login process

Android QR scanner

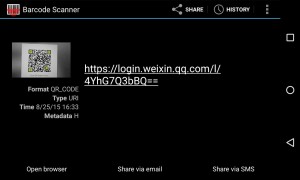
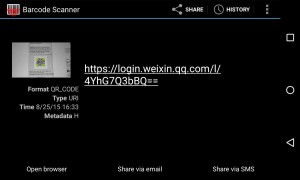
First thing I want to do is see what this QR code is. I use a library which reads QR codes (https://github.com/dm77/barcodescanner)[1. This library recognizes different barcode formats, so instead of using a QR code, I could potentially do authentication using any of these: UPC_A, UPC_E, EAN_13, EAN_8, RSS_14, CODE_39, CODE_93, CODE_128, ITF, CODABAR, QR_CODE, DATA_MATRIX, PDF_417].I could have taken a screenshot of the QR code and fed it to an online QR code reader, but I wanted to make an app that lets me authenticate in a similar fashion WeChat does. I made a simple android activity that used the library, based on the tutorial. Here are two examples of the QR code content.

https://login.weixin.qq.com/l/oaW3V0XQpA==
https://login.weixin.qq.com/l/lZ-ez97Vdg==
https://login.weixin.qq.com/l/4YhG7Q3bBQ==
  • The format is QR_CODE.
  • Type is a URI.
  • Metadata type H.

Metadata type describes the amount of error correction embedded into the QR code. The 4 levels are:

  1. L – Approximately 7% error correction
  2. M – Approximately 15% error correction
  3. Q – Approximately 25% error correction
  4. H – Approximately 30% error correction

Approximately every 5 minutes a new weblink is generated. I tried generating these QR codes on this website to see if they’d look the same visually, but with no luck.

QR generated
WeChat QR
QR generated
Generated QR

Although these two images encode the same content, visually it looks different. I have no idea why.

Website

The website generates a new QR code each time the page is refreshed. Our first goal is to setup a web server. I’ll go with Rails, reason being I like Ruby and Rails is a good framework. May extend it to something more fun later without doing a rewrite.

Handshaking Process

I did some googling and didn’t find how the handshaking works. There is an article on an app called SQRL (Secure QR Login), which describes it as:

On your phone, a SQRL app would contain a secret 256-bit blob of data. This would be your randomly generated secret code, which is never divulged to anybody else. The QR code itself would contain a URL, including the domain name of the site you’re trying to connect to. When you scan the code, your app would create a public and private key pair from your master key and the domain name of the site, using an HMAC hashing function. Then, the app would communicate with the site directly, sending the public key as your identity (the equivalent of a username), and the encrypted QR code as your authentication (the equivalent of a password). Since your master code, the secret blob of data, never changes, the resulting public key wouldn’t change either. That means the website would know it’s you. And by encrypting the QR code of the site with your private key, the site can verify that you indeed possess the matching private key, without actually having it, thanks to the beauty of public key cryptography.

Keeping in mind how this works, I came up with the following authentication process.

  • Keep a secret in the phone app.
  • The QR encodes a link causes